
Like I have said in a lot of my posts….I don’t want to break the bank furnishing this house. And if I am being 100% honest….I’ve spent a lot of money in the past on new items (everything from curtain rods to drapes to furniture…like silly STUPID money at times) and guess what….it was a complete WASTE of money! The quality just isn’t there on so many of the items you purchase for hundreds of dollars these days! OMG and NOW I sound like an old person. Seriously…I know I do, but our elders are right! “They don’t make things like they used to” – says everyone at some point in their adult life. The hubs and I have a ’53 Chevy Bel Air in the garage and I feel safer driving around in that than I do in my little VW.
OK…totally off topic but you get my drift…I want nice quality in my home without spending thousands. Now back to curtains….
I found an amazing tutorial by Rachel at Maison de Pax to create these curtain rods. Click HERE to read her tutorial. PS – her blog and DIY projects are so inspiring – OMG!! Definitely take a peek around her blog for even more home inspo!!!
The instructions in her tutorial make creating these SO simple. But because no two homes are exactly that same, below are a few extra tips that may help you as you work through this project in your home!!
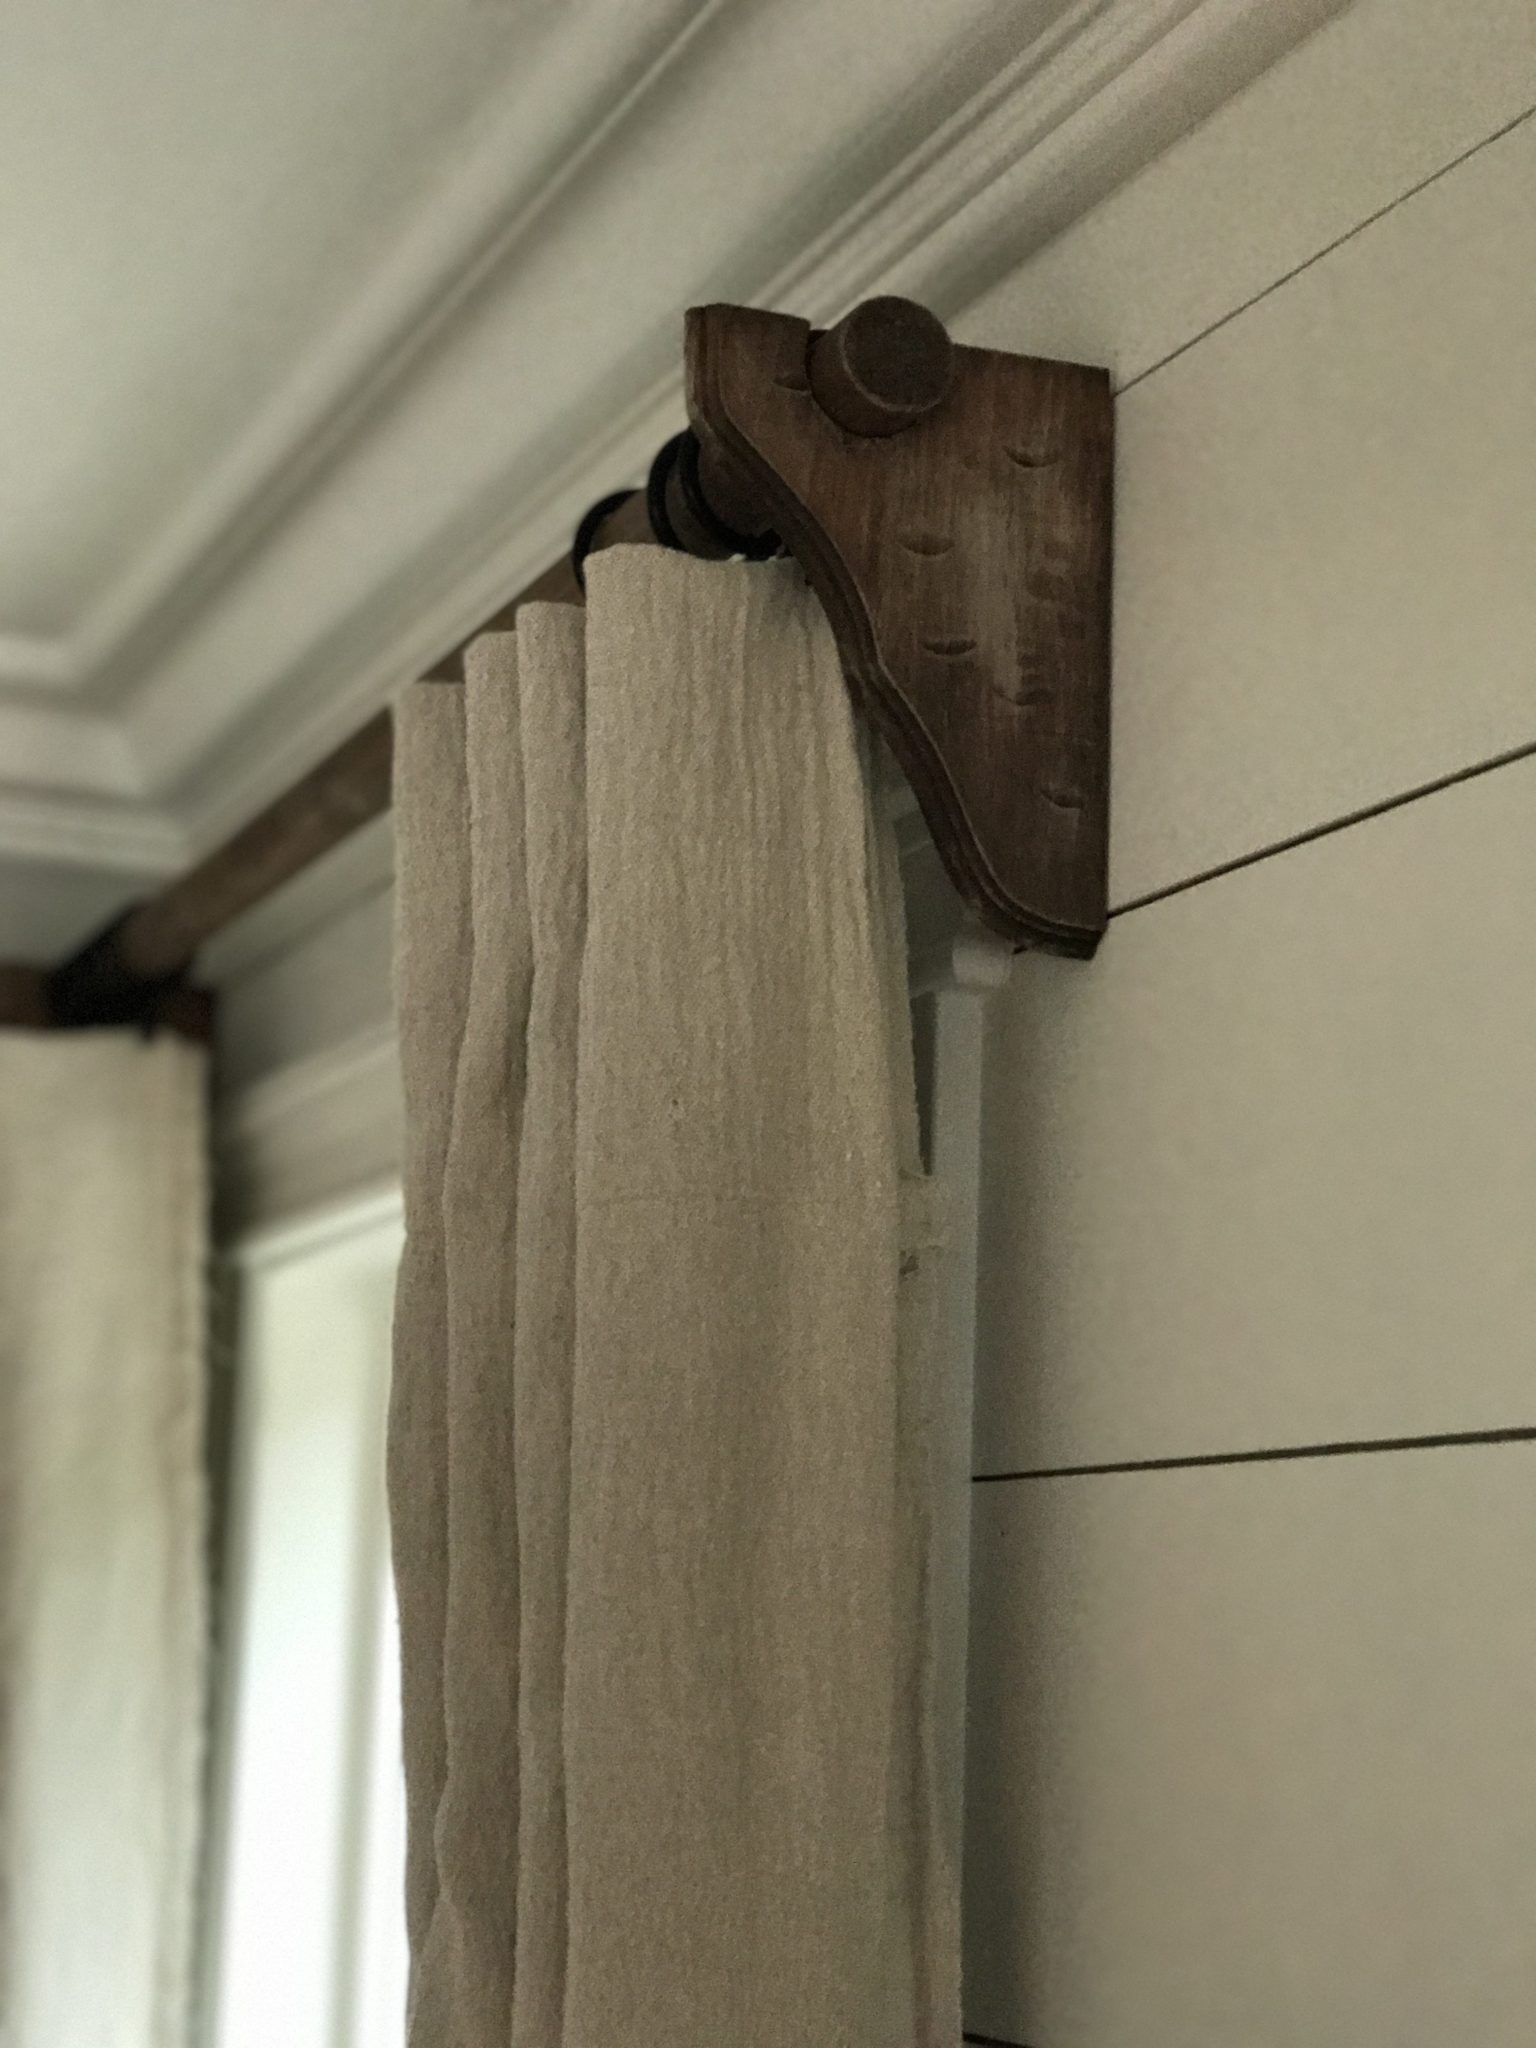
– Corbels (I recommend using 3 corbels if your rod is longer than 100″ or if your curtains are a heavy material on a longer rod)
– Dowels – this is the thickness I used. The rods I purchased were all different size lengths – I purchased them precut from Home Depot at 4′, 8′ and 11′ and then used my miter saw to cut them to length
– Battery Operated Drill (we have an order model of this one) and a hole saw to make cuts for a 1.25″ dowel
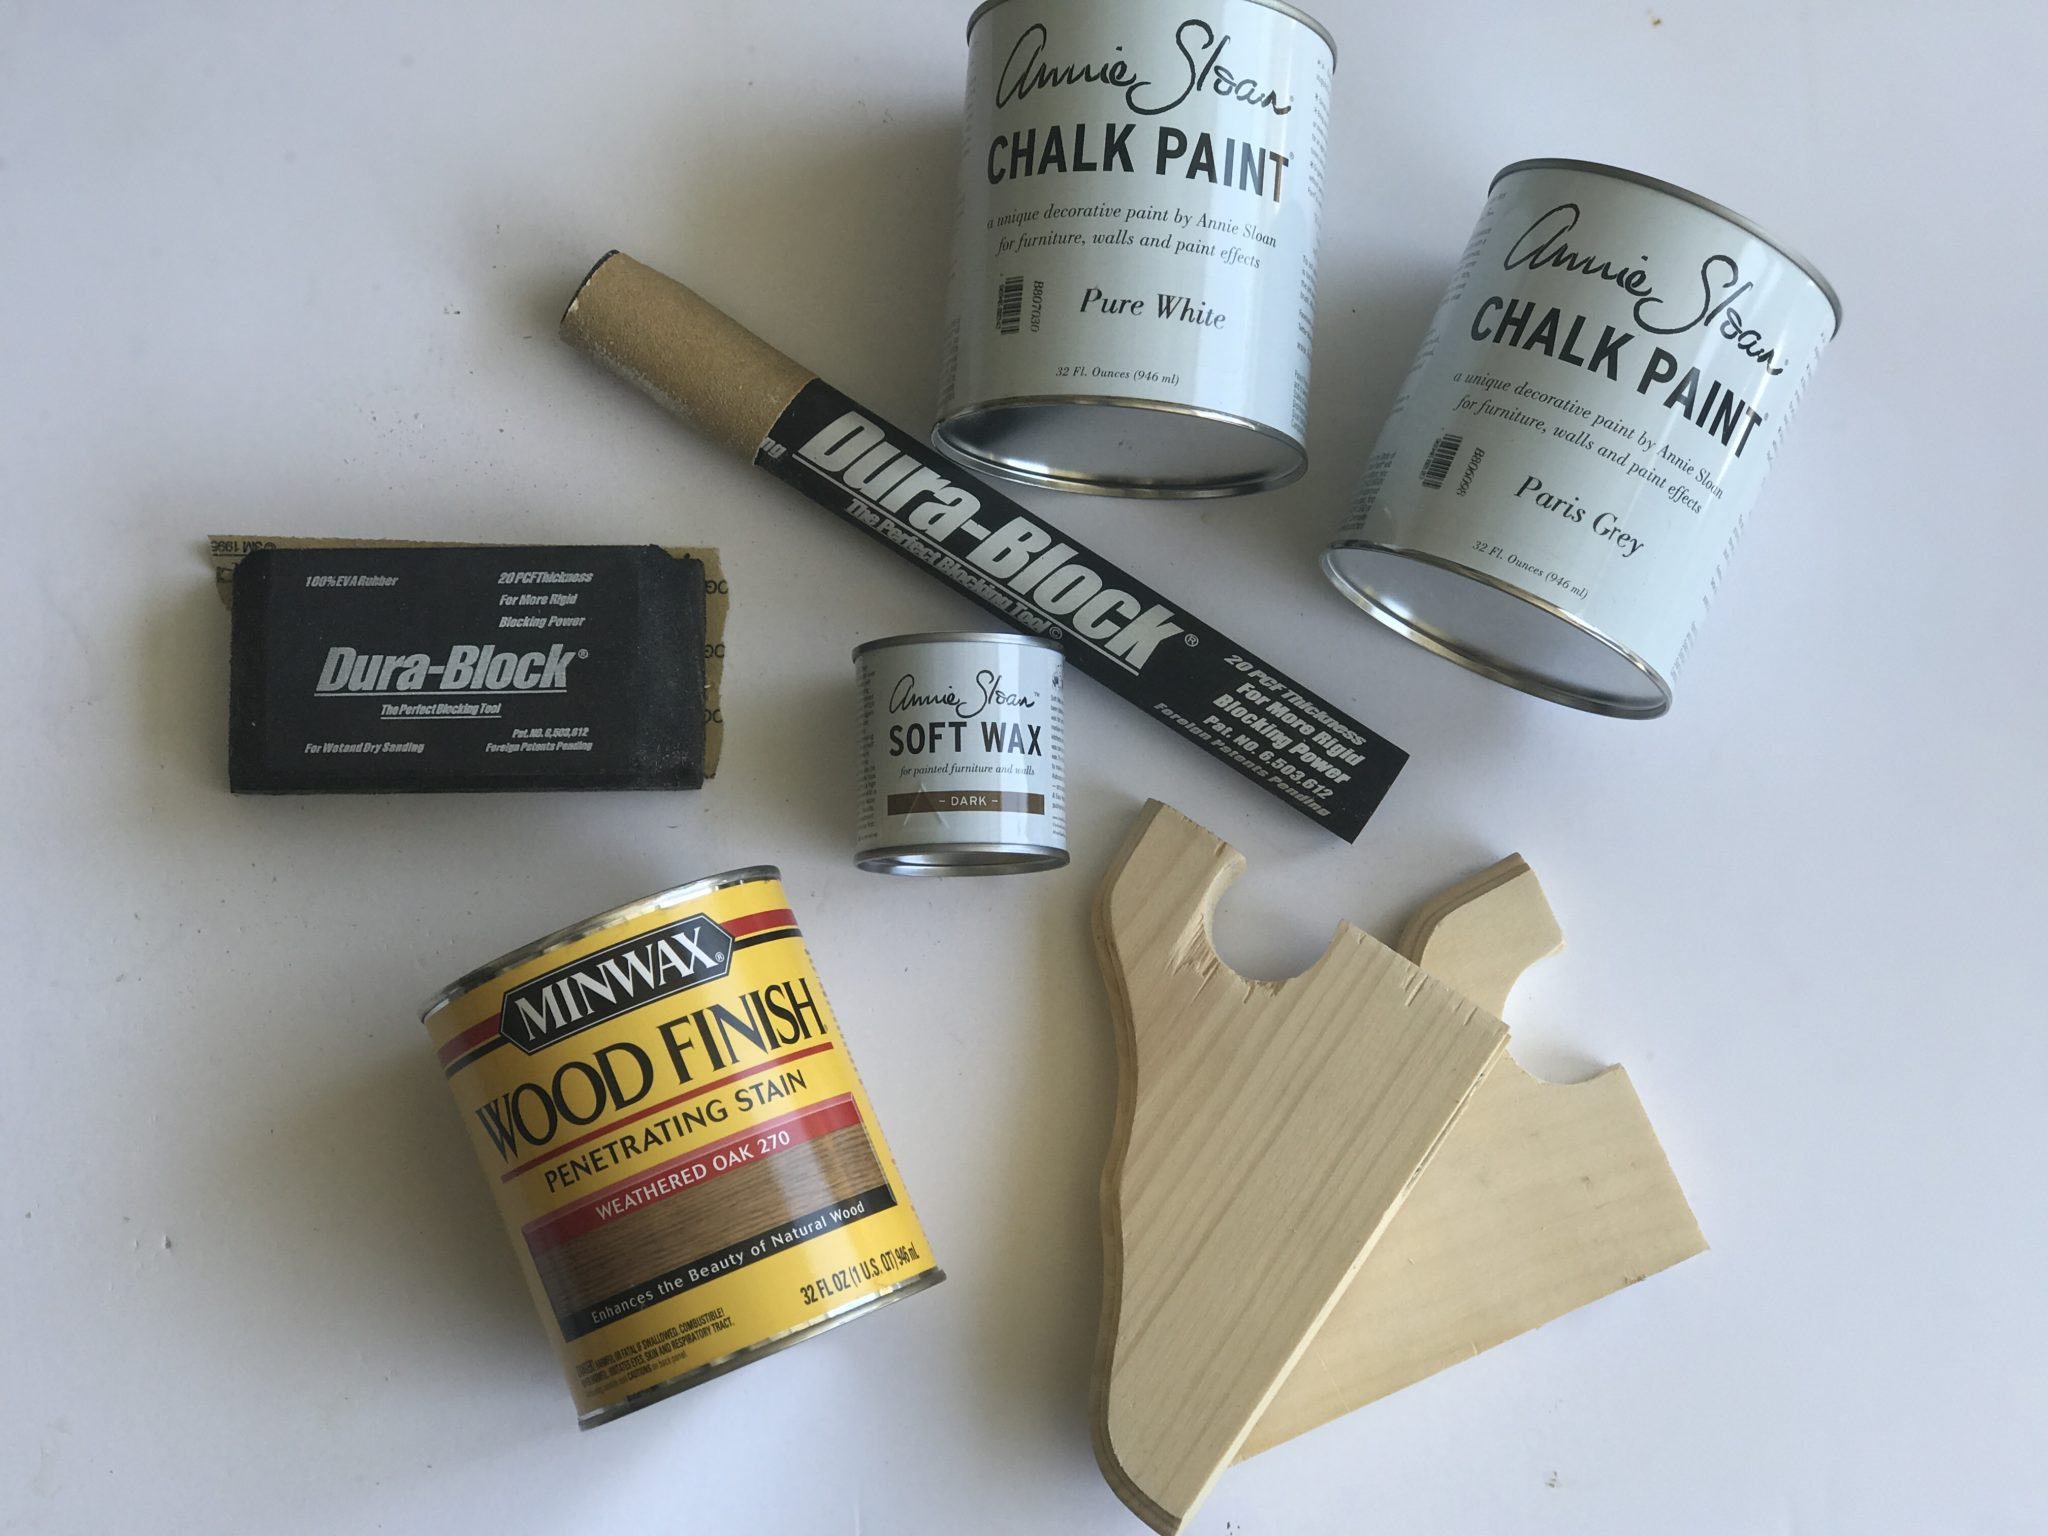
– Round Dura Block Sanding Stick – this is SERIOUSLY the BEST thing ever to help smooth out the rough cuts from the hole saw. We have sticky sand paper on hand always because my hubby works on his ’53 Chevy. It’s a little pricy to buy initially BUT we’ve had the same roll FOREVER!! We also have a sanding block that I use A LOT for various project and did for this one as well to sand the rods and sides of the corbels.
- For distressing your corbels – we learned that distressing them first (by hitting them with a hammer) is better to do before you cut your corbels for the rods. They have a little more integrity before they are cut. (We broke one or two in half when trying to distress is….OPPSY!)
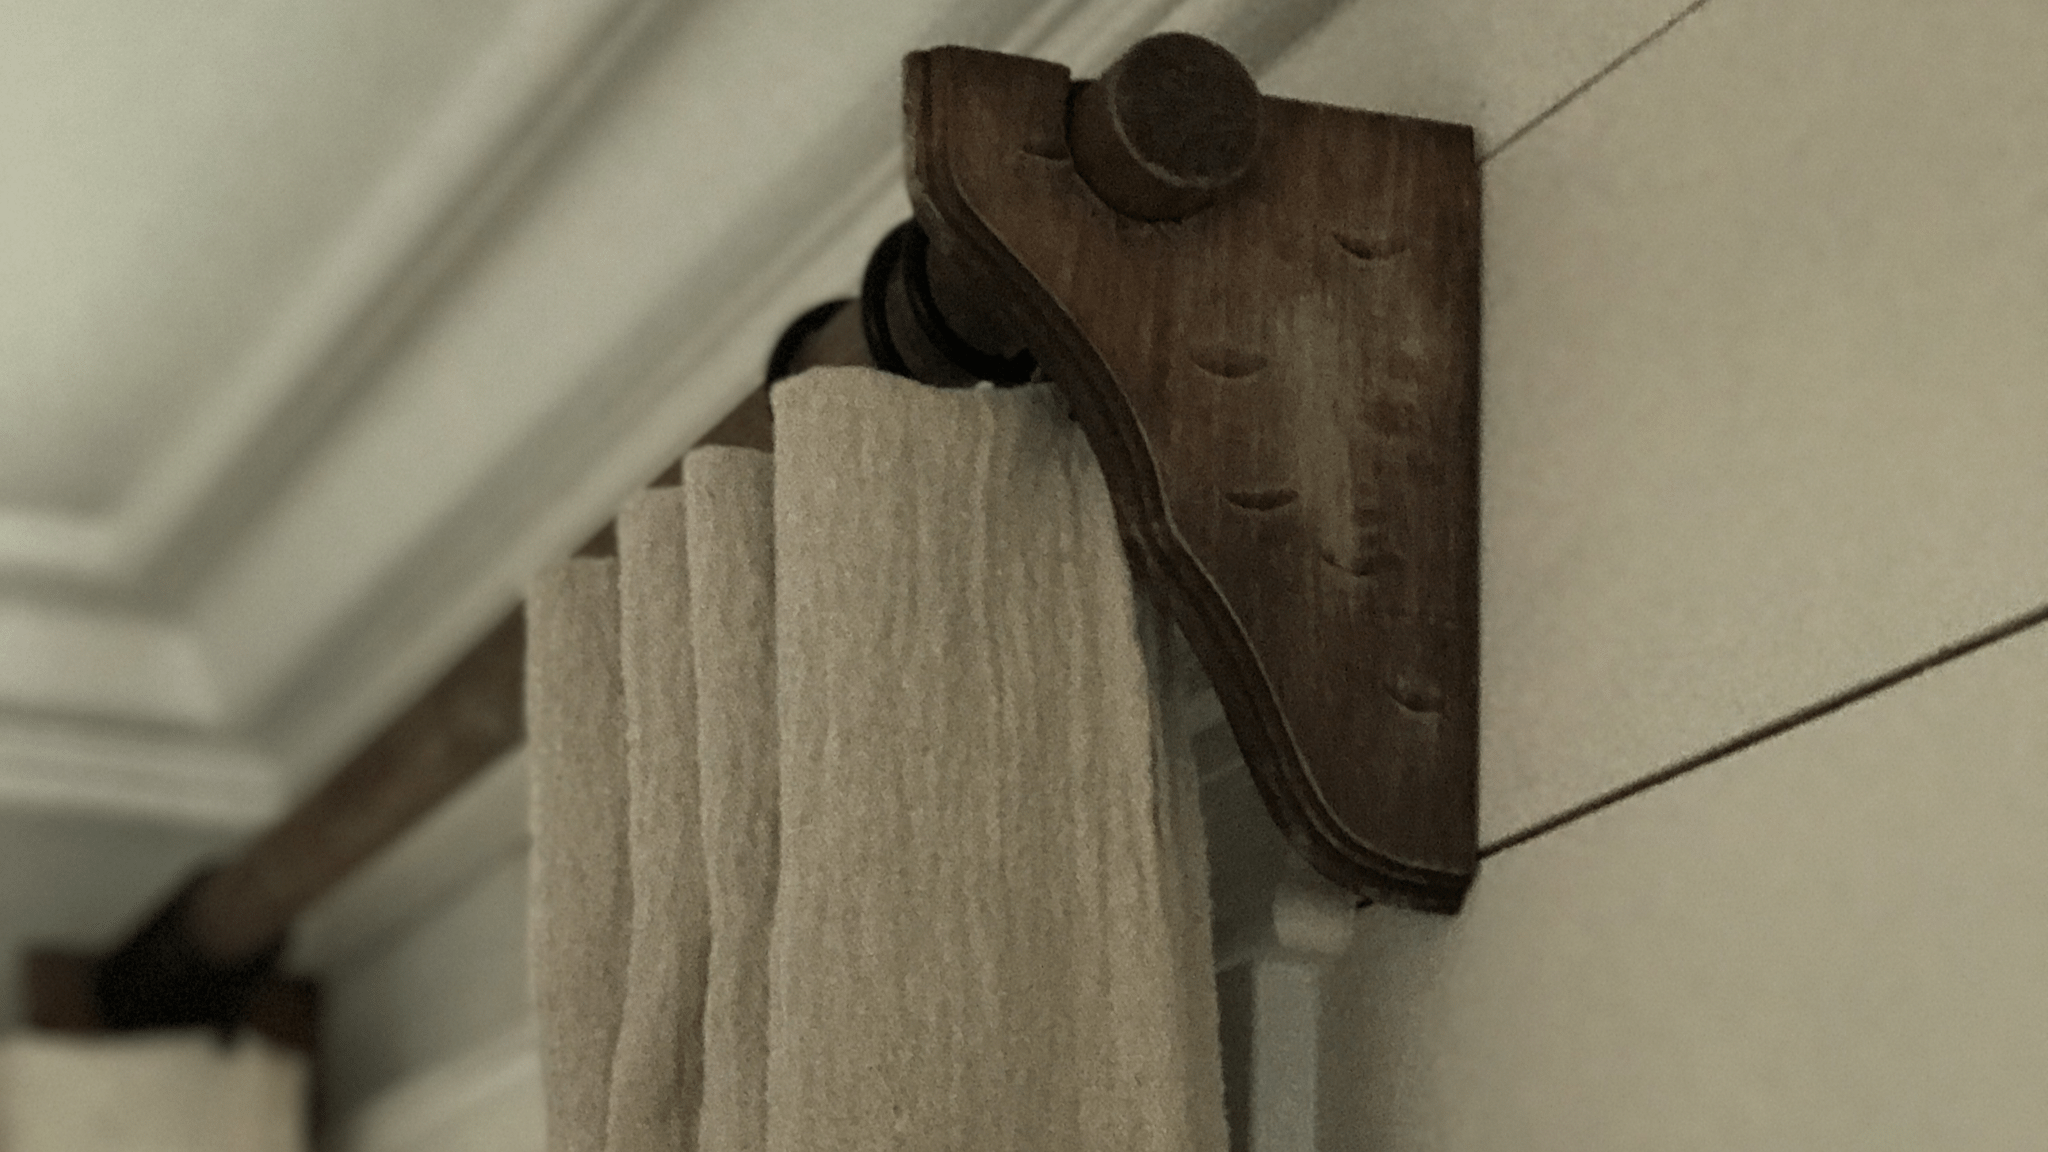
- For the stain – I planned to use Weathered Oak (which is why it’s in the picture above) because I had it on hand and used it for other projects in the house. BUT I really didn’t like the finish on the inexpensive wood corbel, so mid project I ran to Home Depot and switched to English Chestnut and LOVE it! See link above. I definitely recommend using a stain with a darker finish.
- I used Annie Sloan Pure White and Paris Gray to dry brush my corbels. And then I used Annie Sloan clear wax ONLY. After testing the dark wax, it really diminished the white paint I had brushed on so I went with clear wax only and I love the finish!
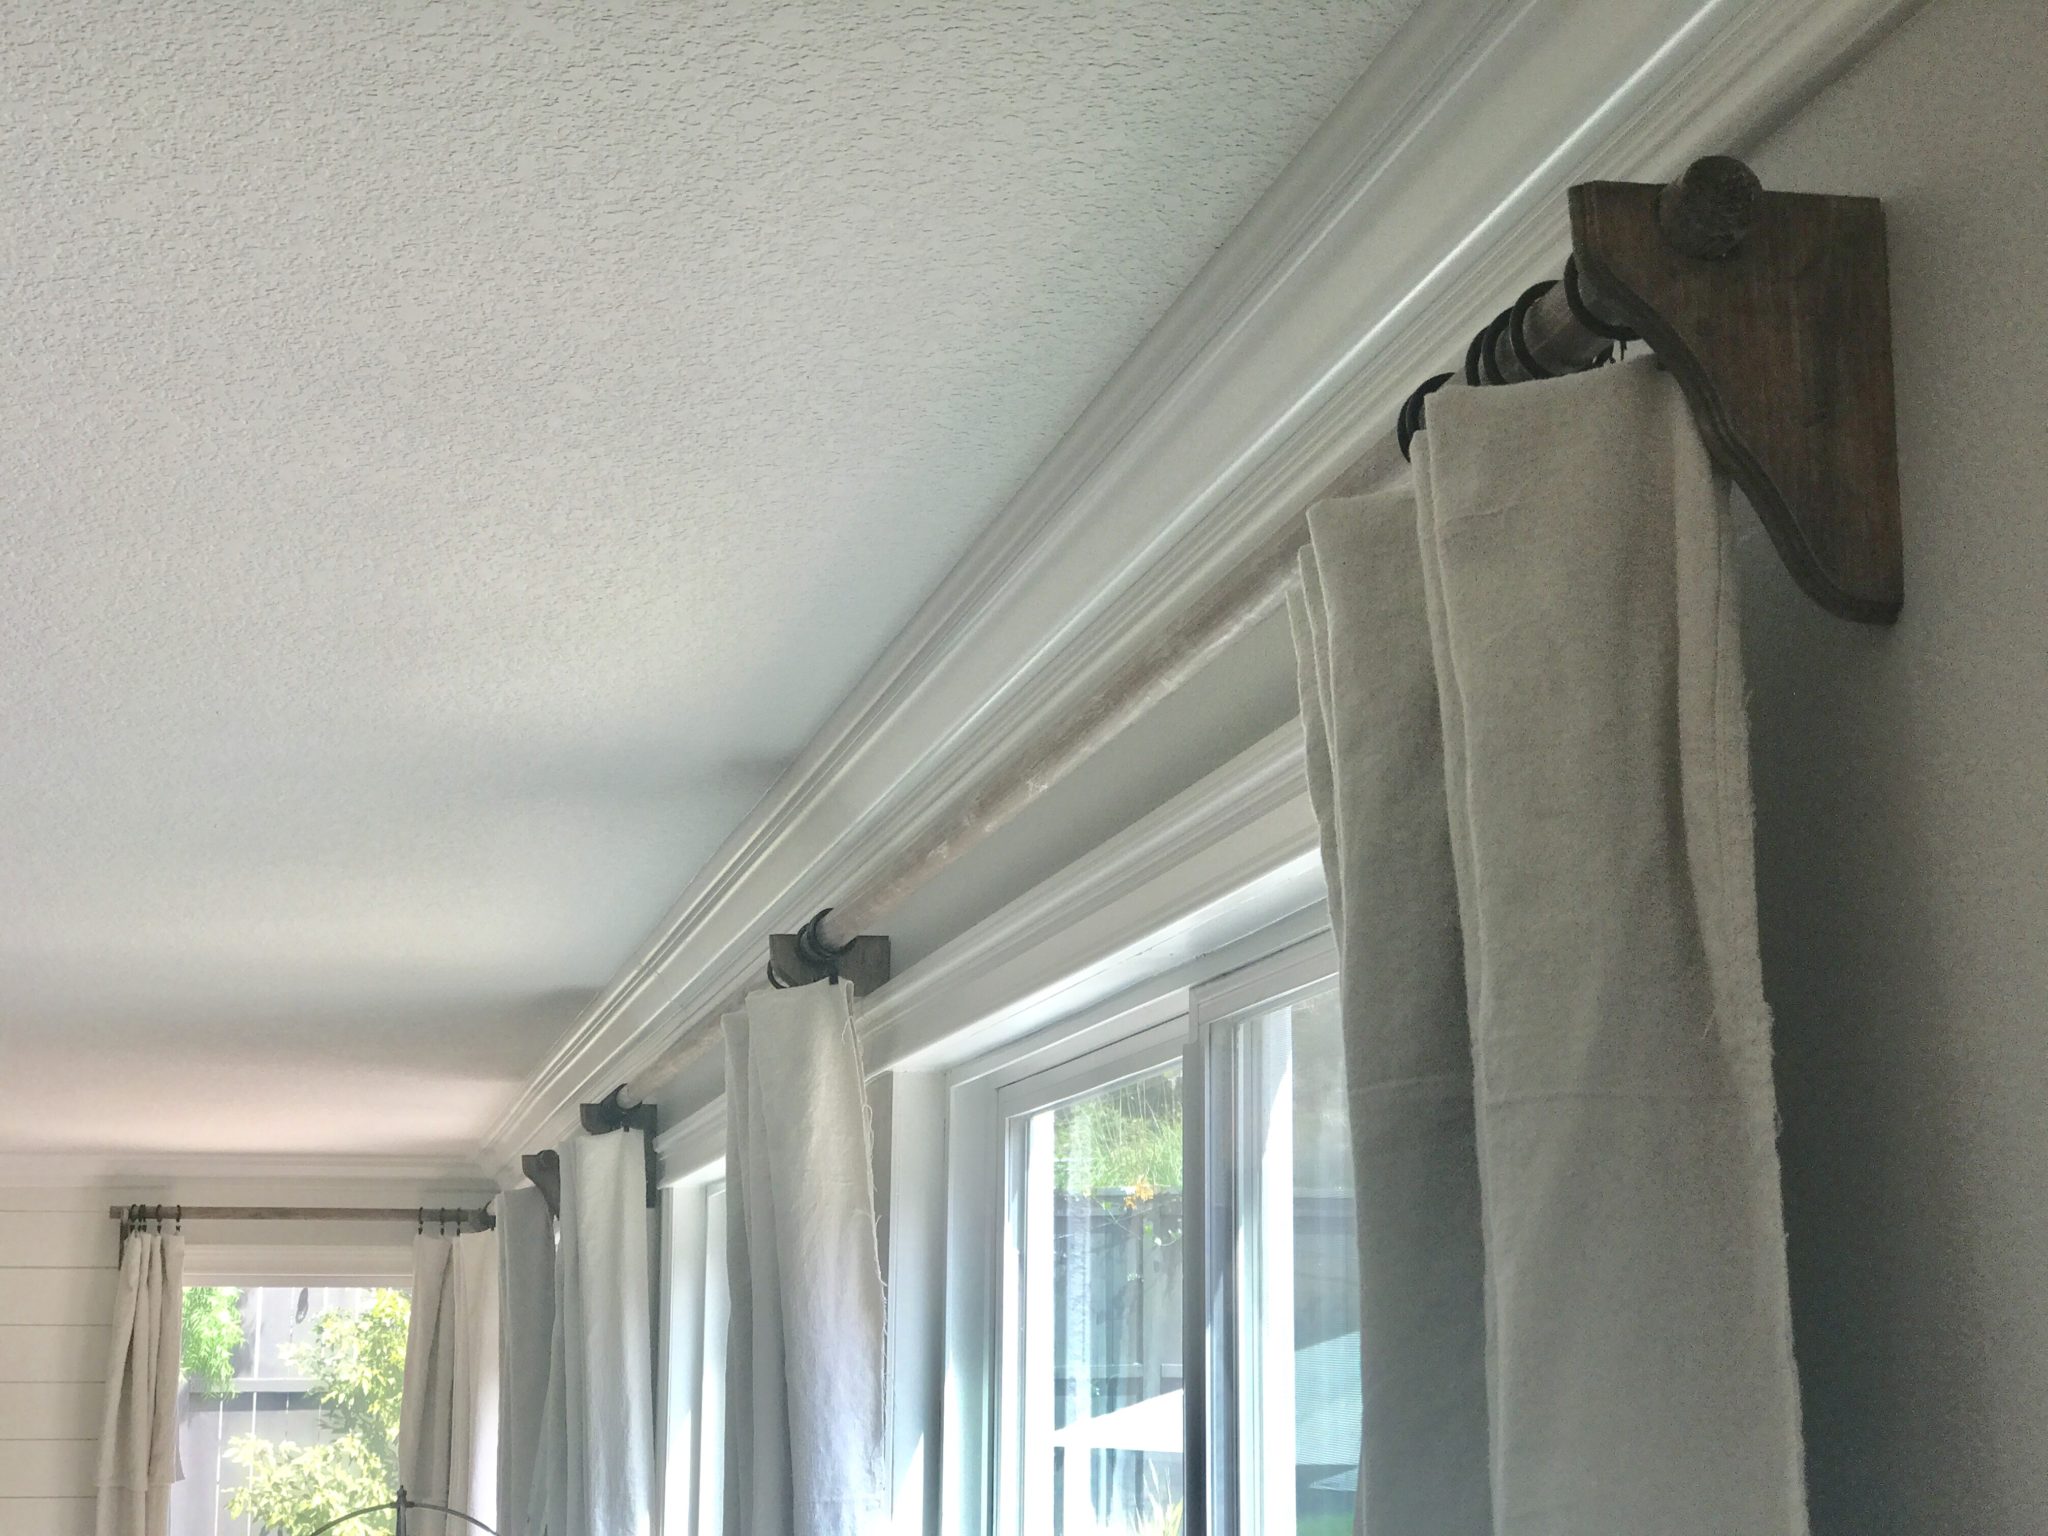
5. Where to hang them…so when you look at the back of your corbels you will notice they aren’t all perfectly even. PLUS all of the semi circles you cored out may not be 100% the same. It made it difficult to be able to use an exact measurement to say “ok I need to measure 3 inches down from the ceiling and 6 inches out from the window and that’s where I drill”. Handmade means perfectly imperfect 🙂 So to ensure we didn’t put 9 million holes in the wall trying to hang the curtains, there were a few tricks we used to make it easier. I put painters tape on the back of my corbels, poked a hole in the tape at the exact spot the screw needed to be and would use that as my guide on the wall to hang the corbels. We used that method to hang the first corbel in the pair, and then using the curtain rod, a level and the approximate measurements from the first hung corbel, we would mark our next spot for corbel #2. We used the painter tape trick again to make sure we drilled in the right spot. We managed to get all 6 rods and 11 corbels up and level on the first try. Check out this quick video for a little more info on my painter tape trick.
6. If you have a massive window like I do (see pic below) and it’s longer than 11′, then you will need to put two rods together to create one that is long enough. Measure the window and overall length you want the rod to be. Divide that by two, make two rods of equal length then use a dowel screw (HERE) to connect the two rods together. When hanging that rod, place a corbel right at the point where they connect. You will notice we had cut our corbel down to fit around our trim but once the curtains are hung around it, you really can’t tell!
And that’s a wrap on the rods! Hope that was helpful 🙂 I am SO excited to continue working on the rest of my house and plan to do color variations of this exact tutorial in each room!
For details on my super “fancy” drop cloth curtains click HERE!
Happy Curtaining Fancy Friends!